Tuesday, June 26, 2018

[v2.0] Ok Google, Open my curtains!

This post is a follow-up to my previous post http://vignesh.foamsnet.com/2018/06/ok-google-open-my-curtains.html.

Note: I've created a github repository which contains the code and some more details. I intend to keep that up to date with newer ideas, etc. https://github.com/vickyg3/curtain-automation

When i posted the previous set-up on reddit, one of them suggested a better way to do this that will overcome the cons of the previous method (noise and lack of manual control).

In a nutshell, these are the replacements i made:
  • Use a stepper motor instead of a servo.
  • Use a timing belt pulley and timing belts instead of a pulley and rope.

Here are the updated list of parts (with links to the cheapest ones i could find online to keep the cost minimum - although i didn't necessarily buy it from these links):

* Mounting bracket for the pulley on the non-motor end - I used a servo mounting bracket with a long screw. I am sure there are better alternatives for this one - $12.99
* Super glue - $4
* Vibration dampener for stepper motor (optional but highly recommended to keep the noise down) - $2.98
* 12V DC adapter - $8.99

Total Cost - $67.69 (some of it can probably be gotten for a cheaper price on ebay/gearbest/aliexpress).

Step 1 - Screw in the mounting bracket

This is quite straightforward. I drilled in a couple of drywall anchors and screwed in the mounting bracket to the wall.

Step 2 - Install the motor and the vibration dampener

Place the vibration dampener on the motor. Make sure that the non-threaded holes on the dampener are touching the motor and use two M3 screws to attach the motor and the dampener. Attach the pulley wheel to the motor's shaft using the screws on the side of the pulley.

Now the motor can be mounted on to the mounting bracket using 2 M3 screws which connect to the dampener's threaded holes.
Motor attached to the mounting bracket (shown without the vibration dampener).

Step 3 - Install the pulley mounting bracket on the other end

I drilled a drywall anchor on the other end and screwed the pulley mounting bracket in. I then used a long screw with a couple of plastic fillers to hold the other pulley roughly in the center.

Step 4 - Loop the timing belt around the pulleys

I had bought an open ended timing belt. I looped it around either pulleys and tightened them as much as i could by hand and cut off the rest of the belt leaving about an inch of overlap. I then used super glue on the extra inch of belt to stick to them together with as much tension as possible. You could also use a clamp like this with a screw to close the loop on the belt.

At this point, you should be able to move the belt manually by hand by pulling it gently in either direction. If so, there is enough tension on the belt to move the curtains.

Step 5 - Attach the curtains to the timing belt

Just as before, i placed the curtains in the completely closed state and attached each curtain to either side of the timing belt using a safety pin.

Here's a sketch from before about how the pulleys and the curtains move:

Step 6 - Program the microcontroller

I used the same NodeMCU ESP8266 controller as before. Here's the gist that contains the Arduino sketch: https://gist.github.com/vickyg3/623ca535b565ed43c8b617a6f7c7c06f (it is a crude version and has a lot of room for improvement, but i left it for another day).

Step 7 - Microcontroller and Motor Driver setup

Here's the wiring:
* DIR+ to D2
* PUL+ to D5
* ENA+ to D8
* DIR-, PUL- and ENA- to GND (can either be bundled together or connected separately to individual GND pins on the NodeMCU)
* A+, A-, B+ and B- need to be connected to the motor (refer to the motor's spec for the wiring colors for your motor).
* The switches on the driver need to be set to ON, ON, OFF, ON, ON, OFF (S3 and S6 should be off).

Connect the DC power supply to the driver. I cut the ends of an old DC adapter and identified the positive and negative wires using a multimeter.

I then glued the driver and the NodeMCU board to the wall behind the curtain using small command strips. Any double sided tape should work as they aren't that heavy.

Step 8 - Home Assistant Configuration


That is pretty much it. For more details on how you can control it from Google Home/Alexa, please see my previous post.

The noise level of the old servo based system was around 60 decibels (as measured by an app on my phone). The new system with vibration dampeners works at 30-35 decibels and is barely audible. Most of the noise is from the curtains actually moving on the rod.

Here's how it works (The video is noisy because the roomba was running when i recorded the clip):


Here's a video without much of external noise:


Saturday, June 16, 2018

Ok Google, Open my curtains!

Finally I've found a worthy enough reason to write a blog post.

I've been wanting to make the curtains in my home "smart" for a while now. I have what is called "grommet curtains"  and there are apparently no off the shelf solutions to automate this. There is this kickstarter project called Slide which retrofits to any curtain type, but that is still in its early stages and a bit pricey (~$150).

I ran into a tutorial which spoke about automating grommet curtains. But they used a 3d-printer to print custom designed components which wasn't an option for me (I don't have a 3d printer and i don't have any knowledge of how to design components for a 3d printer).

I borrowed the basic idea from that video. Two pulleys at either end with a rope running around them. One of the pulleys is attached to a servo which is controlled by a microcontroller. Here's an awful sketch of the idea:

Here are some of the challenges faced/things i did:
  • There is no cheap off the shelf servo that has a pulley attached to it. So i had to tweak around to figure out a way to mount a pulley to the servo.
  • The load on the servo to pull the rope along with the curtains is pretty high. So the servo has to be mounted securely to the wall. I first tried a heavy duty double sided tape, but that wasn't enough to withstand the tension of the rope. I then tried out various things and found a mount that could be screwed into the wall.
  • The wall mount for the servo held it too close to the wall and there was no room for the pulley (whose diameter is larger than the breadth of the servo) to fit in and rotate smoothly. So i used a couple of washers behind each mounting screw to give enough room for the pulley.
  • To tie the other pulley (which has no motor), i simply used a rope to tie the pulley on to the curtain rod's mounting bracket.
  • The servo had to have metal gears in order to have enough torque to pull the curtains. But such servos need a minimum of 4.8 volts of power. I found a NodeMCU board which had a 5V pin to supply enough power to the servo.


Here are the list of parts with links to where i bought them:

* NodeMCU (ESP8266) microcontroller (model with 5V pin) - Amazon - $5.98
* Jumper wire (to connect to the 5V pin) - Amazon - $5.24
* MG995 Servo (360 degree, metal gear, digital model) - Amazon - $10.99
* Servo wall mount - Amazon - $12.99
* Washers - I just used a couple of old washers lying around. Equivalent link: Home Depot - $2
* Pulley (for attaching with servo) - Servocity - $3.49
* Pulley (for the other end) - Home Depot -  $2.47
* Rope - Home Depot - $3.98
* Safety pins - Amazon - $3.15

Total Cost - $50.33 (some of it can probably be gotten for a cheaper price on ebay/gearbest/aliexpress).

Ok, with all that out of the way, let me explain how exactly i built and programmed this.

Step 1 - Attach pulley to the servo

Attaching the winch pulley to the servo is quite straight-forward. I screwed in the 4 pieces of the pulley with 2 bolts (on diagonally opposite ends) and small hex nuts. I then attached one of the servo horns to the other two holes of the pulley with two small screws (that came with the servo).

Now, the servo horn can merely be screwed into the servo until it's fairly tight.

Step 2 - Install the mounting bracket

After marking two spots with the mounting bracket's holes, i drilled in two drywall anchors on those spots. Then use two screws to screw the mounting bracket into the wall placing two washers in between the mounting bracket and the wall. This makes sure there is enough room to mount the servo along with the pulley.
This is the bracket i used to mount the servo to the wall
Step 3 - Attach servo to the mounting bracket

This is very straight-forward. The only catch is i used two nuts instead of 4 to attach the servo on to the mounting bracket.
Servo mount with washer behind. Pulley attached to the servo.
Step 4 - Mount the pulley on the other end

I used a small rope to tie the pulley on to the curtain rod's mounting bracket on the other end. A nut and bolt can also be used but since the rope worked for me i didn't look further.

Step 5 - Tie the rope on to the pulleys

Loop the rope around the pulley without the servo once. In the servo end, loop the rope around the pulley at least twice and then tie a really stiff knot. Make sure that the rope is really tight. Cut off any extra rope since it could cause friction when the rope is moving.
Rope tied to the pulleys and attached to the curtains.
Step 6 - Attach the curtains to the rope

I used a couple of safety pins to attach the curtains to the rope. I set the curtains in fully closed positions and then attached each half to one of the ropes. When the pulley spins, both the ropes will move in opposite directions thereby opening each curtain outward. The same process is reversed to close it.
Curtains attached to the rope with safety pins.
Step 7 - Program the microcontroller

This is my first foray into programming a microcontroller and surprisingly enough it was really simple. The NodeMCU ESP8266 board is a $5 wifi enabled board. Wifi means that you can send commands to it through simple HTTP requests.

Here's the arduino sketch i used to make a simple HTTP server that supports 3 commands: left, right and off (which spins the servo left, right and turns off respectively): https://gist.github.com/vickyg3/94b80435fa10a58691f563f643aaf807

Once this is flashed into the board, controlling the servo is simply a matter of "curl http://<ip>/left".

Step 8 - Mount the microcontroller

I mounted the microcontroller near the servo (using a small double side tape on the wifi chip) and just attached the servo wires to the appropriate pins (i used a jumper wire to connect the power wire to the 5 volt pin). I then ran a long micro-usb cable that i had lying around to power the microcontroller.


Step 9 - Home Assistant configuration

I added this to home assistant as a command line cover that used curl. Here's a sample configuration:

Where curtains.sh contains the following:

I determined the time to sleep between rotating the pulley and turning it off by trial and error. It usually took more time to close than to open because the set up struggled a bit to pull the curtains in that direction. It now shows up in home assistant, like so:


That's it. You can now include this in your automations, etc. I have set up automations like close the curtains after sunset, when we are away and so on.

If you have your home assistant tied to google assistant, you can control the curtain by saying "Ok Google, Turn the <curtain name> on/off". If you want custom commands, you can also try ifttt with google assistant to have commands like "Ok Google, open my curtains!".

Here's the Eureka moment

Some cons of this system:
  • The servo is a bit noisy. This is probably ok given that curtain control is not too frequent. It is probably bearable for 10 seconds or so once in a while.
  • Hooking up the curtains this way makes it impossible to control the curtains manually (since the curtains are tied to the rope). I've worked around this by sticking a button next to the curtain by the wall for those scenarios where we don't want to use voice control. Pressing the button will open/close the curtain.
    Button to control the curtains in lieu of voice/phone control.

Comments and suggestions about improving this in any way are welcome!

Sunday, October 25, 2015

Stand-up Paddleboarding!

Off late, we have developed a curious obsession. It's made our weekends much more awesome and active (physically).

Most people here either hike or bike on weekends to keep themselves physically active. I hated hiking mostly because it was sweaty and i just was not physically cut for it. I have tried it a bunch of times in the past and failed to develop any liking towards it whatsoever.

Stand-up Paddleboarding (SUP)!

Gayathri is a huge fan of water related activities. We started out with basic kayak'ing in a near by lake. As we did that, i found that to be super fun. It was literally like sitting on water. We could go at our own pace and it was awesome. As we did that, we started awe'ing at people who did stuff which seemed even more fun - like Stand-up paddleboarding, Wind surfing and Kite boarding.

We decided to give Stand-up Paddleboarding a shot (SUP) as that was the activity that seemed the most fun with the least learning curve. And boy, it was really one of the best decisions we have ever made in life. It was like kayaking, but way better. You were further closer to water, you could stand, sit, kneel, lie down (and even do some yoga while you are at it). You were figuratively walking on water with something easily maneuverable. It was amazing.

Who needs life jackets in the middle of a ~30ft lagoon ...

We are still looking forward to paddleboarding in the pacific ocean (so far did only in lakes and lagoons where the water is fairly still). We are also looking forward to learning the more harder water activites like Wind Surfing and Kite Boarding.

You can literally sleep on water ...

Until then, I highly recommend trying out SUP. Just go to a near by lake this weekend and rent one. I promise you, it will be totally worth it.


-Vignesh

Sunday, February 1, 2015

The Arsenal Obsession #COYG

Despite being raised in India, there has pretty much been only one sport which always appealed to me. It's football (ugh, soccer). And ever since I was a kid (before moving to the states), I have been a fan of one team and one team only. Whenever i describe myself (even on online forums like Twitter Bio, etc.), I always take pride in being an Arsenal fan.

So much so that it's part of our living room!

Life on the Pacific Coast

I moved to the states about two and half years ago and the Arsenal fan in me had a very interesting situation ahead. European football games typically happen on weekend and kick-off is usually somewhere between Noon and 5PM local time. For Arsenal, local time happens to be London time, which is 8 hours ahead my local time, thereby making the US west coast to be the worst possible region to live in for a European football fan. For a game starting at noon in London, i have to be up by 4AM. That's right, 4AM!

Because of this, my typical weekend looks like this:

Say the game is on Sunday at 1PM London Time.
  • I'm usually out on Saturday nights pretty late (either a movie or something else).
  • Back home around midnight.
  • Spend some time playing games or watching something on TV.
  • It's around 2PM or so at this point and dilemma ensues. Do i stay awake for 3 more hours and watch the game, or should i get some sleep (and risk missing the game by oversleeping)?
  • More than often, i end up staying awake the whole night.
  • Watch the game.
  • Sudden existential crisis for the rest of Sunday. What now?


Twitter Effect

When i was in school, we watched games as a group. Always as a group. When i moved to the states, I have been meaning to go to a sports bar and enjoy the game with a supporters group. But i have not managed to do so even once (usually because of the ungodly hours).

Twitter came to the rescue. I usually tweet a lot during the game (and annoy the crap out of my non-football friends) and i have made a lot of new friends (living on various parts of the world) because of that. I now really feel that watching the game with Twitter feed open is as good as watching it with friends. And there's always casualties (TV Remote being the worst victim).

Live

I'm slowly getting towards a point where i might be able to afford to fly to London once or twice during a season. I am really looking forward to making it a habit of attending one or two games every season in person.

And by the way, for the uninitiated, #COYG = Come On You Gunners.

Happy February Everyone!

-Vignesh

Thursday, January 1, 2015

Tis The Season - 2014!

Hola!

This is me with another attempt in vain to remind myself that i should write more.

2014 has been wonderful. Lot of memorable moments. First full year as a married person. A wife who loves you more than the world. A job that, well, i really have no words to describe it, it's that good. I could not have imagined a better life.

The year started just like any other. The first big moment was in March where we celebrated our first anniversary.

And then along came a pretty sweet moment at work. I got an opportunity to give a recorded-talk at Google I/O, Google's annual developer conference. It was a big deal as developers from all over Earth tune into it.


Then thanks to my girl we got to spend the summer in Seattle as she was taking up an internship there. It was three awesome months that encompassed a wide range of cool things like living across the street from Space Needle, flying on a sea plane, an awesome trip to the island capital of British Columbia. Not to mention, getting away from the heat of California's summer.


Along came October where there was a really fun filled party for her birthday.


Then came the holidays where we did crazy things like reaching 130ft beneath the Pacific Ocean on a submarine.

126ft beneath the Pacific Ocean!

I am writing this as we pack our stuff headed to celebrate the dawn of 2015 in random parts of the California West Coast.

Until then, Mahalo & Happy new year 2015!

To end this post, a random quote from Phoebe that always makes me laugh - "If you wanna receive email about my upcoming shows, please give me money so that i can buy a computer".

-Vignesh

P.S.: I cheated in this post by including more pictures than words. Although, i really hope that i will write more in 2015!

Tuesday, July 15, 2014

The story behind Seattle's floating homes!

In Seattle, there are a lot of people who live on the waterfront (in Lake Union). There are two types of floating life shelters: Floating Homes and Houseboats.

Houseboats are one of the most ingenious ways i’ve ever seen of gaming the system. It’s a pretty long but very interesting story. Read on.

Back in the early 1900s, people who could not afford a house on land in Seattle started building simple house-like structures using some logs and put them on Lake Union and started living there. Since the lake was open to the public, anybody was allowed to build such a "floating home" free of cost and live there.

People who lived on such floating homes did not pay any property taxes. On realizing that, a lot of people who lived on land started moving to the lake and naturally it started getting crowded. Since these floating homes did not have proper sewage system, people started to dump all their waste on the lake and hence it started to become a mess.

The City of Seattle then decided enough is enough, and drew up some regulations on how many floating homes will be allowed on the lake and designated certain spots in the lake to be for the exclusive use of floating homes. Since the number of homes were limited and they were always docked, they also decided to hard wire them into the city’s sewer and electricity systems. Thereby, floating homes were started to be considered as regular homes and people needed to pay property taxes on them.


P5230410-300x225.jpg
The floating home used in the movie Sleepless in Seattle

When something becomes “limited edition”, obviously the prices go up. So all of a sudden, what was once the home of people who could not afford a house became a limited edition floating home that started to go for millions of dollars. Also, sewage and electricity were no more an issue.

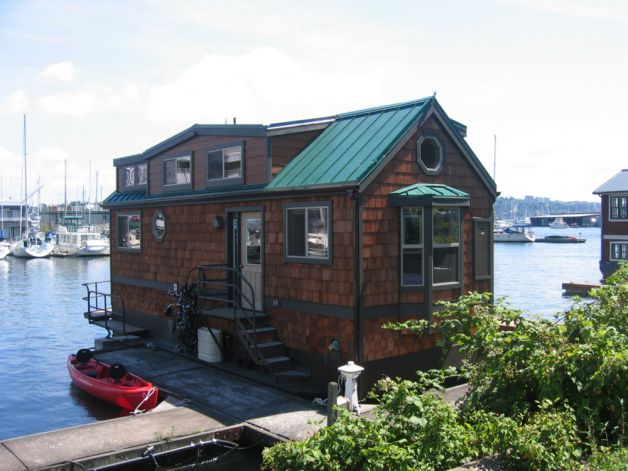
Now, there were this new class of people who couldn’t afford a home on the land, and obviously not the waterfront as well. So they just started to put a roof on their boats, and started living there. Since they were just regular boats, there was no restriction on how many such boats could be in the lake as long they are registered vessels. It gradually evolved and today’s “boats” look like this:

628x471.jpg

628x471 (1).jpg

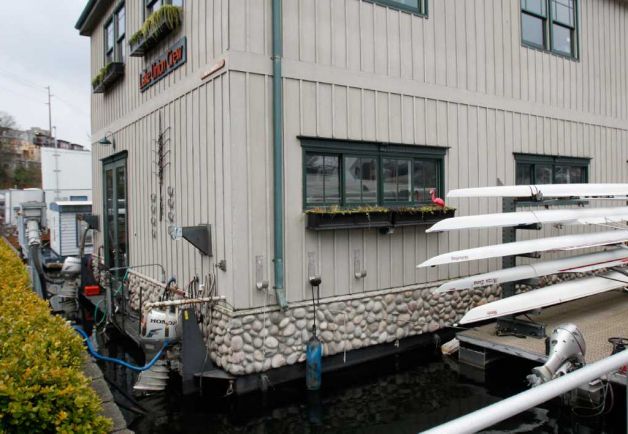
You see what they did there? It’s a lake and obviously the city cannot put a limit on the number of boats allowed on the lake. These “boats” are registered as vehicles to the DMV and are authorized to be in the lake wherever and whenever they want. The only restriction being, “they should be able to move on their own”. So all they need is to have a motor underneath that will help them achieve that criteria.

628x471 (2).jpg

If you look closely at the above photo, you can see a Honda motor attached to it on the bottom left. It’s very impractical for the city to enforce that rule on a day-to-day basis. So most of these boats, even though they self-propel at the time they are registered to the DMV, they hardly remain so throughout the year.

So today, you can find a lot of such "Houseboats" on the waterfront of Lake Union in Seattle.

P.S.: This was a story that was told to me when i took the Rode The Duck in Seattle. It’s really an awesome tour and i highly recommend taking it if you are visiting Seattle.

P.P.S.: I originally wrote this for this Quora question: "What are the best examples of people gaming the system?"


-Vignesh

Friday, June 27, 2014

Use your Chromecast/Roku on a Hotel WiFi

Chromecast and Roku are really wonderful devices which allow you to take all your media with you where ever you go. Especially, if you travel a lot, it's definitely way better to watch something on your Netflix subscription rather than paying exorbitant rates on the hotel's pay-per-view.

But there's a problem. Hotel WiFi's usually use web based authentication (i.e.) their wireless network is usually open and anyone can connect to it. Only when you try and open a webpage, they send you to an authentication page that asks for a username/password (which the hotel will provide you) and/or asks you to accept the terms and conditions.

The problem is that Chromecast and Roku do not have native support for such authentication. But fear not, in this post, i am going to write about a few ways in which you can work around this limitation to enjoy Roku/Chromecast on the hotel's WiFi network.

Find out your device's MAC Address

2 of the 3 workarounds that i mention requires you to know the MAC Address of your Chromecast/Roku device. Here's how you figure it out:

Roku
  • Switch it on
  • Navigate to Settings->Network->Wireless
  • On the bottom right, you can see the MAC Address of the Roku
Chromecast
  • Switch it on
  • Connect your phone to the hotel WiFi and authenticate it
  • Open the Chromecast Setup app on your android phone
  • Tap on devices and wait for it to scan
  • Tap on your Chromecast device in the list
  • Tap "Set Up"
  • Tap "I see the code"
  • Tap "Set Name"
  • The MAC Address of your chromecast will be displayed on the screen now. 
Workaround 1 - Call the Tech Support

Most hotels give you a small sheet of paper with your WiFi username and password. That sheet usually also has a "tech support" phone number. Here is what you can do: Call the tech support number and tell them exactly this: "I would like to use the roku media player device over the hotel WiFi. I wanted to check if you could whitelist the MAC Address of my device to by-pass the authentication page".

Depending on the mood and knowledge of the tech support person, he/she might say okay. But nevertheless, it's gonna take some time before the whitelist happens. And once the whitelist happens, you can enjoy Chromecast/Roku over the hotel WiFi.

Workaround 2 - Spoof your MAC and authenticate from your laptop

The whole web authentication system works around MAC addresses. Once you enter your username and password, your MAC and IP addresses are going to be whitelisted for a certain amount of time (about 24 hours) and your device will be allowed to access the internet in that time period.

One key weakness about this authentication mechanism is that MAC address is easily spoof'able. So we are going to to assign your Roku/Chromecast's MAC address to your laptop and perform the authentication like usual and then make use of that whitelist to access the internet from your Roku/Chromecast. Here are the steps (follow them precisely to the word):
  • Find the MAC address of your Roku/Chromecast using the steps above. Note it down.
  • Open the terminal (assumes linux).
  • Run "ifconfig" and note down the MAC Address of the laptop. [1]
  • Run this command: "sudo ifconfig wlan0 down".
  • Disconnect from the WiFi network on the laptop.
  • Run this command: "sudo ifconfig wlan0 hw ether <mac address of roku>".
  • IMPORTANT: Turn off the Roku/Chromecast by unplugging it.
  • Run this command: "sudo ifconfig wlan0 up".
  • Connect to the Hotel's WiFi network on the laptop.
  • Open the browser and navigate to google.com (or any other website).
  • It will ask for authentication, provide username/password that the hotel gave you.
  • Type google.com again and verify that you can access Google.
  • Run this command: "sudo ifconfig wlan0 down".
  • Disconnect from the WiFi network on the laptop.
  • Run this command: "sudo ifconfig wlan0 hw ether <mac address of your laptop from step [1] above>".
  • Run this command: "sudo ifconfig wlan0 up".
  • Now you can plug your Chromecast/Roku back in and connect to the Hotel's WiFi network on that. It should now be connected to the internet!
You will have to repeat these steps after the whitelist expires (usually about once a day).

Note: The above two work arounds will connect your Chromecast/Roku directly to the hotel's WiFi 

Workaround 3 - Set up your own WiFi network

Buy a portable WiFi adapter and use that to share your Hotel's WiFi through your own access point.

Hope this helps!

-Vignesh

Saturday, March 8, 2014

Chromecast URL Player

I was annoyed by the fact that the Chromecast SDK has been out for the public for quite a while and yet googling for a simple URL player for Chromecast did not yield satisfactory results. So I sat down to create my own simple web app for playing back any http video or viewing any still image in Chromecast.

URL: http://movies.foamsnet.com

Source Code: https://github.com/vickyg3/UrlPlayer

Would love to hear feedback. Feel free to fork, send pull requests.


-Vignesh

Monday, November 4, 2013

Introducing Super Secure File - One File, Completely Secure, Access Anywhere!

Super Secure File gets you a really secure password protected file that you can access anywhere with an internet connection. Smartphone, Tablet, Laptop, SmartTV, anything!

To cut to the chase and create your Super Secure File, go to: http://secure.foamsnet.com.

How does it work?

Super Secure File basically uses Google Drive to store your encrypted file and does all the encryption and decryption locally in Javascript. The key never ever leaves your computer. Once you close the tab, boom, the key is gone. Nobody knows the key but you (and probably your spouse if you are married).

Motivation

This is not a big feat or anything, this is merely a mashup of a few libraries to prove a point to myself. The motive behind this app is to build a secure mechanism to store my passwords and credit card numbers on the cloud so that I can access it anywhere. I do not trust anyone who links me up to a server when it comes to information like this. Which is why i wanted a completely static HTML page with no server access whatsoever to provide me with this functionality.

Feel free to examine the source code here (and please let me know if you find anything utterly stupid): https://github.com/vickyg3/super-secure-file

Hosting and Links

Since this is a static page, I have not hosted this on my server. This is merely hosted as a github page (if you look at the repo, you'll see the default branch to be gh-pages and not master). Hosting it as a github page also proves that it has no server interaction whatsoever and cannot steal your key by any mean.

So, all you need is to remember your password and one of these URLs (they all redirect to the same Github Page): http://bit.ly/securefile or http://bit.ly/supersecurefile or http://secure.foamsnet.com or http://vickyg3.github.io/super-secure-file/super_secure_file.html

Get your Super Secure File and make your life a little easier! :-)


-Vignesh

Wednesday, October 23, 2013

Open sourcing Social Photos

I have been working on a lot of open source projects lately (chromium, AOSP, ffmpeg, etc.) and I have had this tremendous change in the way i look at software projects now. I am all the more convinced that open source is the only right way of doing software.

With that in mind, I've made a pledge to myself that no matter what I do, I am going to put the source out there. As a first step, i'm open sourcing the one big project of mine, Social Photos.

The source can be found here: https://github.com/vickyg3/social-photos

It is a snapshot of the one that's currently powering the live site: http://socialphotos.net (with API keys redacted). Feel free to fork and use as you please. Although i'd appreciate a link back, it's not mandatory. Also, i'll be more than happy to look at Pull Requests.

One of the main reasons that developers (including myself) don't post our code out there is that we are ashamed of our code. I was really ashamed by the number of hacks i did in this project that i couldn't even think of making it public. I'm over it. I'm ready to accept people fixing my mistakes.

Happy Coding!


-Vignesh

Tuesday, October 8, 2013

Why do we always have to f*** the opponents?

Note: This article is related to soccer (and other American sports).

I have always been a football (soccer) fan. In fact, i refuse to call it soccer, but for the sake of convenience, I am going to mention it as soccer the whole of this post.


I have been going to a lot of games lately (soccer, football as well as baseball). One common behavior I see across all these sports is that, the home fans always have an attitude that the opponents suck and we gotta f*** them. There are loads of banners, tifos, chants, etc. which are particularly targeted against the opponent players. Usually, fans just pick on random opponent players. They wouldn't know anything about that player, they merely look at the back of the jersey for his name and start yelling "hey <name>, you suck". For no reason.

Is yelling vulgarity at opponents really called passion?

I am an Arsenal fan by heart. I have been following Arsenal ever since i started watching soccer. As much as I want Arsenal to win, that doesn't mean i feel that the opponents suck. As much as I hate Robin Van Persie leave Arsenal, It doesn't mean that I don't enjoy watching him score quality goals for Manchester United.

I really enjoy the positive passion in local home games, but why can't the passion and support be just about us? About how good our players are? Do we really need to pick on the opponents to show that we are passionate about the sport and the team?

Consider this post by the 1906ultras. Before I say anything, I really want to make this very clear: I am a big San Jose Earthquakes fan. I take it really personally when they lose. I love the Ultras and the passion that they put in to Buck Shaw. But for such a wonderful and passionate supporter group like the Ultras, do we really need such vulgarity? There's nothing wrong in hoping Colorado will lose, but do we really need to f*** Seattle? If you look at all the other posts by them, they are all really positive and it actually ignites passion in the heart of every fan. And not to forget the recent letter to the players written by the ultras. It even gave my wife goosebumps (she just started following sports and she has never been so passionate about a team before). Why can't it just be about these good things? Why do we need to f*** the opponents?

Just to be clear, I am all for booing the referee when he makes a mistake, or even yelling at an opponent when he behaves in an unsporting manner. But not because he plays extremely well causing trouble to our team. I recently happened to be in Seattle and went for an MLS game there. They have their own supporters groups who are as passionate as us (ok, may not be as much as us). That doesn't make them our enemies or anything. Even though I liked the atmosphere there, I couldn't join them on even a single chant because it just didn't feel right. That's the kind of passion we want. We don't have to hate others to be passionate about our team.

Even in India, where people are crazy about Cricket, butchering and yelling at opponent players does not happen. The Indian Premier League (it is the major cricket tournament in India), has teams and players from all over the country as well as the word. But there the fans don't yell that opponents suck, instead they cheer their players, they say good things about their players no matter what. They respect the opponents.

I love San Jose Earthquakes. My heart will never cheer for another MLS team ever. I love ultras. Even though I don't sit in section 109, i always chant with them involuntarily throughout the game. But i'd really love it if the fans (not just the ultras, everyone) can focus more about the good stuff on our side rather than yelling at opponents.

It is called "home advantage" for a reason. It is not called "away disadvantage". Even the players exchange jerseys with opponents after the game. Why should we see them as enemies? Let's make the opponents feel welcome. Let's beat them in the sport on the field, not with words off the field.

As Eric Raymond said in Cathedral and Bazaar, Any energy you spend hating the opponents would be better spent on loving our team's craft (rephrased to fit into context).

Even though this post talks vastly about soccer, I have seen this happen in all the American games (baseball, football and probably hockey too).

For the first time in life, I have the opportunity to follow a team I love passionately by going to the stadium week after week. This is just my 20 cents for making real passion come out of any sport. Supporting your team is one thing, but bashing the opponents.. doesn't make you sound like a good person. Just think about it for a second before yelling.


-Vignesh

Friday, September 20, 2013

Bucket List of People to Meet in Lifetime!

We all love meeting celebrities. Because of the geography that I live in right now, I have had the opportunity to meet quite a few of them over the past year.

I always had this list of people to meet in person before I die in my mind. Until a year ago, It was mostly more of a fantasy list. But once I moved to where I am now, the fantasy started becoming reality. So I wanted to transfer that list from my brain to a document so that I don't miss out on anyone if an opportunity knocks on the door.

Here is the list (in no particular order):

PersonWho/What/Why?Met/Been There?Note/Souvenir
Thierry HenryThe person I respect the most in the world.No-
Don KnuthFather of modern computer science.No-
Dennis RitchieFounder of C (The R in K&R).Not possible anymore!-
Brian KernighanFounder of C (The K in K&R).Yes2013-06-20: Autograph
Linus TorvaldsFounder of Linux and Git. Strongly believes in whatever he believes in.No-
Robert LoveA huge contributor to the Linux kernel.Yes2013-06-13: Autograph
Bjarne StroustrupFounder of C++.Yes2013-08-15: Picture with him & Autograph
Randall MunroeHe is a hero of mine and worship his sense of Sarcasm and WitNo-
Matthew PerryMy most favorite actor in the world.No-
Lisa KudrowMy most favorite actress in the world.No-
Michael SchumacherHe was a huge inspiration as i grew up watching him win.No-
Larry & SergeyMy role models in life.YesEvery Fridays (now every Thursdays).
Matt CuttsOne of the early employees of Google and famous for his work on Web Spam.Yes2012-12-20: Lunch
Jeff DeanThe most bad-ass engineer ever.Yes2013-01-22: A walk around Charleston Park
Stade De FranceMy most favorite football stadium in the world.No-
Nou CampThe holy grail of football.No-
The Corrs (Sharon Corr)My most favorite band and most favorite violinist.No-
Felicity HuffmanHer character's attitude in Desperate Housewives resembles almost 100% that of my wife.No-
Jim ParsonsWho wouldn't wanna meet him?No-
Ramsus LerdorfFounder of PHP. The language i have written most of my code in.No-
Jeffrey ArcherMost favorite author in the world.No-
Paolo MaldiniI grew up watching him play. Perfect combination of style and class.No-
Arsene WengerI grew up watching him. One of the most inspirational people.No-
Vint CerfThe reason why we all have a job. Founder of TCP.Yes2012-11-20: Said hi and shook hands
Kunnakudi VaidyanathanA person who can talk with violin.Not possible anymore!-
Ron RivestThe R in RSA.No-
Petr MitrichevHas been Topcoder #1 for many years.No-
Mary Lynn RajskubSecond most favorite actress.No-

I will try to keep this list updated mostly as a record for myself rather than for the world to see.


-Vignesh

Wednesday, September 11, 2013

VLC Media Player: Automatically Skip Songs in Indian Movies!


I watch a lot of movies. Really a lot. And VLC Media Player is my (and many others') favorite. Indian movies are plagued with songs in irrelevant times and most of the time it just interrupts the pace/flow of the movie. No offense to music lovers/music makers, I like listening to songs in general. But I don't like them in the middle of an important scene in the movie.

The Problem

Whenever a song starts, inevitably I try to use the seek bar (using the seek bar is really one of the big pain points of any media player as it almost never takes you to where you want) and seek to the end of the song. Most of the time I end up seeking either just after the song (thereby missing something important) or to some portion in between the song (thereby having to wait for some more time for the song to end).

As an engineer, I naturally wondered, Wouldn't it be wonderful to have an automated way (preferably a keyboard shortcut) to just skip the song and move to the more important stuff?

This is exactly what I sat down to solve. Based on this xkcd, it seemed like it would be worth the time.And I (sort of) have a perfect solution that helps me skip songs automatically in the press of a button in VLC Media Player.

The Solution

As hard as the problem might seem, I ended up using a very simple heuristic. Start analyzing the audio stream, and whenever there is a silence for about a second or so, it's likely that the song ends there. I just came up with this heuristic based on the fact that most Indian movie songs are continuous (either lyric or the music goes on throughout the song without any breaks) and when the song ends, there is usually a small interval of silence before the next scene starts. And if there is a silence somewhere in between the song, just do the analysis again and it will take you to the next silence which is most likely the end of the song.

Is it perfect? Absolutely not. It's not even a solution, it's more of a heuristic (aka hack) which exploits some pattern in the Indian movie songs. And in my observation (I have been using this for quite a while now), It seems to be working correctly 99% of the time.

Implementation Details

Note: This section has technical jibber-jabber. If all you care about is how to use the script in your VLC media player, skip ahead to the "Usage" section.

First things first, I chose VLC media player, because that's the one I use. If you aren't using it, then you should start using it too. To begin with, we need to query VLC Media Player.

The overall flow goes something like this:
  1. Get the name of the file that VLC is currently playing
  2. Get the time point of the current playback from VLC
  3. Analyze the audio stream of the file and detect the next silence beginning from the time point of current playback
  4. Seek VLC to the determined duration where silence was detected (this is likely the end point of our song)
As complex as these steps might seem, they are fairly trivial to accomplish. To perform steps 1, 2 and 4 all we need to do is enable the HTTP interface in VLC. Once that's done, it is straightforward to get details of playback and control the player through a simple HTTP interface. The 2nd step is a little more tricky as it involves analysis of the audio stream of a file. Fortunately, we have a swiss army knife in our hands which will not only analyze the audio stream, but pin point us to the exact location of silence that we are looking for. The tool is none other than FFmpeg. The silence detect filter in ffmpeg has been used to accomplish this.

Here is a rough sketch of the ffmpeg command that I use:

ffmpeg -ss <start_time> -i <input_file> -t 600 -vn -af silencedetect=noise=0.1 -f null -

Let me break that up:
  • -ss <start_time> :- seeks to the specified time in the input file. this value for this is obtained from VLC's HTTP interface
  • -i <input_file> :- absolute path of the file that VLC is currently playing. this value is obtained from VLC's HTTP interface
  • -t 600 :- analyzes only 600 seconds (10 minutes) of audio to detect for silence (as Indian movie songs are hardly longer than 10 minutes).
  • -vn :- ignore the video
  • -af silencedetect=noise=0.1 :- enable the silence detection filter with a threshold of 0.1dB. this value was picked by trial and error.
  • -f null - :- just print the output of the filter in stdout rather than a file.

We then grep for the exact duration and then seek VLC based on this output.

Code

Look into the variables on top of the file and change them as per your environment if required.

Usage

To use this script, you need to install the following (fairly straightforward if you are tech-savy, but doable even if you are not).


Once you do the above steps, all you need to do is to bind a keyboard shortcut such that the script will execute. For Mac, I used Keyboard Maestro to set up a global keyboard shortcut which will invoke the script. There should be an equivalent program for Windows/Linux too. So that whenever a song starts, I merely use the keyboard shortcut to skip it.

Hope you enjoy it.


-Vignesh


Education is a cure for all problems. Donate for the cause of Educating kids: Computer Kindness Foundation is helping schools to build Libraries. Follow the link to contribute.

Monday, July 29, 2013

Our Story!


Circa May 2005 - The Characters

Boy - A 10th standard student in Coimbatore, who moves to Madurai for higher secondary schooling.

Girl - A 10th standard student in Chennai. No prizes for guessing where she moves for her higher secondary schooling!

May 2005 to June 2007 - The Beginning

As many would anticipate, they both ended up being classmates in their new school. Despite that, sadly, nothing interesting happened in this period of time (we know, they were such idiots back then!). They just looked at each other on random days and barely spoke.

June 2007 - The Actual Beginning

The girl moved back to Chennai and the boy moved back to Coimbatore for college. As with most couples of this generation, they started conversing with each other in the form on SMS'es and phone calls. Few days after that, they felt they were really close to each other. Few months after that, they realized they can't live without each other.

Few Months (or years) Later

The boy was on a late night train journey and as it was always, they were talking over phone (despite the annoying train noise). He felt something spontaneously and popped the question. It took a while for him to get an answer, but it was an answer that he rejoices till today!

P.S. The time frame of the above paragraph is omitted intentionally. ;-)

September 2011 - LGTM

The girl told about her life choice to her parents and the boy did the same to his parents. Both of them were genuinely happy instantaneously. No hesitation, No fuss, Pure happiness. It was then they realized how gifted they were to have such wonderful parents!

September 2012 - Its Official

The boy and the girl got engaged on September 2nd, 2012. It was a small but wonderful ceremony with family and friends.

December 2012 to March 2013 - The Present

We are writing this draft over a video chat (damn you geography!). We are really excited about the brand new phase of our lives that we are about to step on to. So please mark your calendars and try to be there on our special day, as your wishes would mean a whole world to us!

By the way, the girl's name is Gayathri and the boy's name is Vignesh! :-)

March 2013 and Beyond

We are undergoing our "Happily ever after" phase. :-)

P.S.: I didn't write this now. I am just copying this from my wedding website. Since that domain expired, I wanted this to live somewhere on the internet.


-Vignesh